Vectors Design How to Make a Heart on Illustrator
In the following tutorial, you will learn how to draw a heart in Adobe Illustrator in six simple steps. You will learn how to easily turn a rectangle into a rounded rectangle, how to rotate and duplicate it, how to cut and unite vector shapes, and finally, how to warp your heart shape in Illustrator.
How to Make a Heart in Illustrator
Step 1
Pick the Rectangle Tool (M) from your toolbar and focus on the color settings. Remove the color from the stroke and then select the fill and set its color to R=255 G=29 B=37.
Move to your artboard and simply create a 150 x 350 px shape. You can either click and drag to create this shape or you can click on your artboard and enter the Width and Height values in the newly opened Rectangle window.


Step 2
Switch to the Direct Selection Tool (A) and select your rectangle. Hover over one of the corners of this shape and click and drag to easily turn your rectangle into a rounded rectangle, as shown in the second image.
Alternatively, you can select your entire rectangle, focus on the control panel, and enter 75 px in the Corners input field.


Step 3
Select your rounded rectangle and rotate it 45 degrees to the left. You can do this manually using the bounding box that's available when the Selection Tool (V) is active or by going to Object > Transform > Rotate. Set the Angle to 45 degrees and click OK.
Make sure that your shape stays selected and go again to Object > Transform > Rotate. This time, set the Angle to 90 degrees and click the Copy button to add a copy of your shape that's rotated 90 degrees to the right.


Step 4
Select both of your shapes and pick the Shape Builder Tool (Shift-M) from your toolbar.
Hold down Alt and simply click the two sections highlighted in the first two images to remove them. In the end, things should look like in the third image.


Step 5
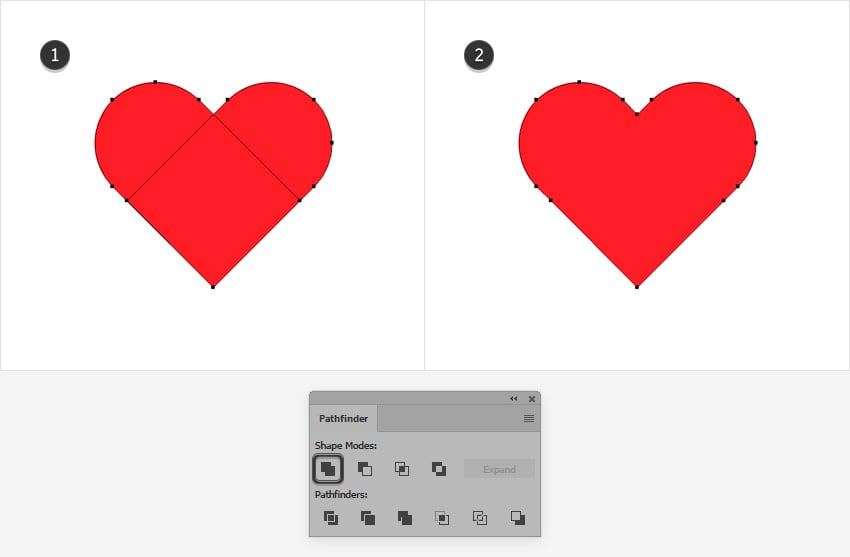
Make sure that your two shapes are selected, open the Pathfinder panel (Window > Pathfinder), click the Unite button, and you've got your heart shape in Illustrator.


Step 6
Finally, you can use a Warp effect to bulge your heart in Illustrator. Make sure that you have it selected and go to Effect > Warp > FishEye. Keep the Horizontal box checked, drag the Bend slider to 20%, and click OK to easily stylize your heart shape in Illustrator.


Congratulations! You're Done!
Here is how it should look. Now that you know how to draw a heart in Illustrator can further stylize it and turn into a more complex design.
You can find some great sources of inspiration at Envato Elements, with interesting solutions to improve this heart in Illustrator.


Popular Assets From Envato Elements
Envato Elements is an excellent resource for heart shapes in Illustrator. Here's an example:
35 Illustrator Heart Shapes - Handdrawn (AI, EPS, PNG, SVG)
If you're in a hurry or you simply can't be bothered to learn how make a heart in Illustrator, this small pack of heart elements might be the solution. This pack comes with a variety of hand-drawn heart shapes that can be used in any type of design.


Want to Learn More?
We have loads of tutorials on Envato Tuts+, from beginner to intermediate level. Take a look!
Vectors Design How to Make a Heart on Illustrator
Source: https://design.tutsplus.com/tutorials/how-to-make-a-heart-in-illustrator--cms-38045